Showing posts with label Raspberry pi. Show all posts

Wednesday, August 6, 2014

Arduino + Raspberry Pi + servo + camera

Arduinos were one of my purchases this summer. With our free time before school starts here in Pakistan, I've ripped through the whole tutorial book and started my first project.

I've got the Raspberrypi set up to take time-lapse photos, something that I wrote about a few months ago. Now I have an Arduino kit that came with servo-motors so I can add motion to my time-lapse.

I have two separate scripts running. The Arduino language looks like Java and if there are any differences, I can't spot them. I re-wrote some of the tutorial code for the servo:

#include <Servo.h> // servo library

Servo servo1; // servo control object

void setup()
{
servo1.attach(9);
}

void loop()
{
int position;

for(position = 0; position < 180; position += 1)
{
servo1.write(position); // Move to next position
delay(10000); // Short pause to allow it to move
}
}

I don't know Java very well, so the tutorials were great. The electric circuit side of the Arduino was easy thanks to Mr. Rutherford's 7th grade class. I've only spent an hour or two with Java, but you certainly don't need to learn it too in depth for simple projects like this.

So now I have a servo that is turning 1 degree every 10 seconds.

I adjusted my Pi's camera script to snap a picture every 10 seconds too. It is written in Python:

import os
import time

i = 0

while i <= 200:
imageNum = str(i)
os.system(“raspistill -o image%s.jpg”%(imageNum))
i += 1
time.sleep(10)

I do need to adjust the code to dump the pictures onto a usb drive...it would save me one step later, but the script is simple and works as is.

Here is the set-up.
(yup, the camera is upside-down...but it is easier to fix in post)


Yes, I am running the Pi off of a portable USB quick charger. These are marketed as phone chargers, and that is why I bought it. This little experiment shows that it has the power to run the Pi and the camera, but is probably not a great long term solution. The USB charger is also being charged... it is like a lil UPS system, which is necessary in a city where the power goes off every few hours due to 'load sharing' and the generator (we are lucky to have one) kicks in 2 minutes later.

The box is just that, an empty box. I attached the pi camera with two little screws and hooked it to the servo motor arm with a stripped twist tie.

To keep it steady, my pocket knife held it down.

Not too fancy, but I didn't have to buy or fabricate anything for the set up.


After hitting the 'upload' button once, I was able to unplug the Arduino from my computer. Every time I re-attached the battery, it started the code again (back at 0 degrees, headed for 180 over 30 minutes), I just had to start the Pi code quickly thereafter. I did that through VNC and snapped pictures of our living room. Test pictures are boring, but I want to check how it looks and how the timing is between the two scripts.
I'm also not going to post a time-lapse of a panorama of the living room while Janet and I read on the couches.

I adjusted the servo to move once a minute, aimed the whole mess out our window and ran it again. In case you were curious, but didn't want to do the math:
Servo turns 1 degree every 60000 mS so 60 seconds I believe
picture every 10 seconds = 6 at each degree.
180 degrees = 180 minutes = 3 hours of camera time.
180 degrees *6 = 1080 pictures
30 frames a second in digital videos = 36 seconds of video.


That video will be added tomorrow.  You may have caught  my bug, i <= 200
so I only got 201 pictures today:


Sunday, May 11, 2014

First Timelapse with the Pi


I need to get a proper set up for the camera.  I used some glittery pipe cleaner through the support holes.

Saturday, May 10, 2014

Raspberry Pi Cam, VNC, Wifi

It's here, the Raspberry Pi camera.  Here meaning here in my living room, it has been available for quite a while now.  Also, a lot of other things.  Here is what I'll be covering today, I learned all of it from browsing other blogs and some Python knowledge, but want to compile today's work into one post and one page for you to learn from.

First: remote access.
    I love to have the TV on, so I don't like using it as a monitor for my Pi.
ssh would not work for me and VNC allows me access from afar.
Setting up VNC:
On the Pi I plugged it into the ethernet to get VNC working.
I started here: http://pihw.wordpress.com/guides/direct-network-connection/ but never got it working.
So I looked at VNC again and started here: http://www.rasptut.co.uk/files/raspberry-pi-vnc.php

Hook up your Pi to a monitor with it's own input devices. On your Pi, in the terminal:
sudo apt-get update
sudo apt-get install vnc-server

To start the VNC-server on your, in your terminal type:
vncserver -geometry 1024x768

Add an 8 character password and it is your choice to add a viewer password.
Note that the first time you run this (the first time since a restart) it is producing a call for :1 (remember this for later)

Now on your laptop/desktop THIS IS FOR LINUX (download from: http://www.realvnc.com/download/viewer/ for MAC OR WINDOWS) download VNC-viewer....which doesn't exist, through apt-get and when you grab the .gz or binaries...well I couldn't get it to work.  This did:

sudo apt-get install xtightvncviewer

On your Pi type in
ifconfig
to get your ip address.  It will be under the eth0 header, we will take this ip address from wlan0 soon.

Back to your laptop, in the terminal:
xtightvncviewer

The GUI fro this is an undersized window that wants the ip address AND :1
It does not look like other shots I've seen of VNC, just this:
Type in the ip: 192.000.0.000:1      -- the ip plus the :1 (which is the port we are accessing on the Pi)

This took me a while to get.  A mix of iffy internet connections here, not reading everything thoroughly.  If you start vncserver on the Pi again you will connect with ip:2 (192.000.0.000:2) When the Pi is restarted it will be 192.000.0.000:1 again.

You will be prompted for the password that you put into your Pi earlier.

That is it, your done!

However, now that you can control your Pi with a remote GUI, you are still stuck with it wired to ethernet.

Wifi was a pain last year.
Wifi is simple now.
I read this: http://www.maketecheasier.com/setup-wifi-on-raspberry-pi/
Then I plugged in the lil wifi dongle, clicked on the Wifi icon that is on the newest release of Wheezy, selected my network and it was online.
Done.

So now you can connect to your Pi over Wifi.

It is time to get the camera running.  I did this all over the Wifi.
Guide: http://thepihut.com/pages/how-to-install-the-raspberry-pi-camera
Before you follow the guide, watch this video: https://www.youtube.com/watch?v=T8T6S5eFpqE At the 2 minute mark it shows how to pull up the tabs and insert the camera's ribbon. Not rocket science, but helpful to see.

Launch xtightvncviewer from your laptop
Start Leafpad up on the Pi
raspistill -o myfirstpipicture.jpg

A few seconds later you will have your first snap shot.
I wanted to do some time lapse and read a few sites but found it way easier to use my Python knowledge (learned http://learnpythonthehardway.org/ and codecademy.com) I wrote a script to take one picture, mostly to test my scripting:

import os #to pass the arguments into the terminal - at least that is how I understand it
os.system("raspistill -o imagesnap.jpg") #within the " " is what you would normally put into the terminal.

Time Lapse:

import os
import time

i = 0

while i <= 15:
           imageNum = str(i)  #to number your images
           os.system("raspistill -o image%s.jpg"%(imageNum))
           i += 1
          time.sleep(15)

Yes, it is fixed in the number of shots it takes and the time it sleeps.  I'll be writing a new script to take these as input arguments when the timelapse.py is started.  The ones I read were messy (in my opinion) but they work.  More importantly, it is easy to script all of this with Python and there are plenty of different ways to do it.

I had everything setup at sunset, but it was dark by the time that the timelapse script ran correctly (messed up the " " placement as I didn't understand that everything within "raspistill -o image%s.jpg" was what would be passed on to the Terminal to be run.  It seems perfectly obvious now.

The script ran and I got 15 pictures of a dark window and Janet cutting up vegetables and closing the curtains.  It works, now I've just got to capture something fun with the time lapse.

But Wait!
There's more!

Getting VNC to start on the Pi automatically so it never needs to see a monitor again.
Ugh I did a few different, long things that didn't work.  Even the parts that said: if you get the following error, try this....   I was still stuck.
Ada to the rescue: https://learn.adafruit.com/adafruit-raspberry-pi-lesson-7-remote-control-with-vnc/running-vncserver-at-startup
it is easy easy easy, but took a lot of searching to find this guide. I won't retype anything from the Ada guide here because there is a lot of fun stuff over at Ada Fruit so it is worth your browsing time.

-Jeff

Thursday, May 8, 2014

Global Codeathon

Travel updates will have to wait.  We did check out Sapa, Halong Bay and Hoi An with my mother and aunt, but school life is taking over for now.

This post is heavy on technology terms.  If you have questions, let me know in the comments.

After the first Vietnam Technology Conference I got more interested in programming.  I started by teaching myself Scratch and using codecademy.com to learn Python.  I started a Scratch after school club that all of you faithful readers have heard about.  Well, here are my new updates and thoughts.

Scratch:
In class over the last month, I've used it to review for geometry and for story telling.  With story telling in Scratch, the sequencing structure and timing of characters talking leads to very different work than student's produce when just writing.  The element of animation, which has added great visuals to their work, is then used during traditional writing time.  "Show not Tell" is not easy for a class of ELL students.  "In your writing, describe how it would look if you made it in Scratch" has been a better way of communicating "Show not Tell" for a few students.
More importantly, setting up a logical sequence, problem solving and teamwork/peer help are the positive side effects of Scratching (to do Scratch).

I wish there was a chat feature in Scratch like there is on Google Docs.  While using Docs, group work is a silent activity but there are an incredible amount of ideas and edits that I watch fly through the chat box, comments and document revisions.  During Scratch time the Scratchers (people who program with Scratch) are moving all over the computer lab (I wish I could say that we had laptops in the classroom...).  This creates a more active and noisy-er class than is normally found in a computer lab.  All of this is the sound of independent learning.

As a teacher, the less I have to instruct and the more that the students share ideas(thus peer teach), the better( in most cases and especially in this case).  The benefits of this are great.  We are within a school with a rigid workbook structure and a focus on the individuals' work.  Group work, open-ended work and projects are a new concept for many of my students.  Relying on their peers during Scratch has improved intra-class communication, teamwork, patience and in some cases, students who do not get along end up helping each other if their projects are similar.

Global Codeathon
The Hanoi Tech Group is a group of teachers from seven different schools in Hanoi.  It is made up of tech directors, ICT teachers, classroom teachers and principals.  We get together, talk about tech in the classroom, pedagogy and how to get Chromebooks into Vietnam without ordering 10,000 (The original number of units that the for a manufacturer wanted to sell to deal with import laws here).  It is about learning from each other and strengthening our network of colleagues.
As a result of the wonderful people in this group, this is happening: The Global Codeathon.  Check out the team at UNIS who has put all of this together.  Some of them were not coding a year ago either.  So, if you haven't started using Scratch or another tool to teach programming, catch up, you'll be confident after 15 minutes.
I have three boys from my class who have been in my Scratch club and have shown a lot of interest in doing projects at home and peer-teaching.  They will be joining the Codeathon as intermediate participants.  I'll be teaching in a very different role.
When teaching with Scratch in class I demonstrate coding, but I never sit down at the 'teacher' computer, the one hooked up to the projector.  Either I:
1. Connect with my Nexus tablet and Teamviewer (advantage is I can see the numbers or zoom in on code on the tablet in case I can't clearly read the numbers from the back of the room)
2. Mini-remote keyboards.  I have to watch the projector, but it responds better than Teamviewer.
3. Wander around and help with individual problems if another student cannot help.

At the Codeathon I will be helping people remotely, through the interwebs.  We (the teachers all over the world who will be helping in the same way) will be meeting to figure out the finer points of this tomorrow.  Google Hangouts has screen-share so seeing someone else's work can be done.  Communicating in the right way will be ... difficult? different?  I like the teaching approach of steering a student towards the answer, but letting them put the last piece or two together if they are able to and ready to.  I know my own class very well, I don't know who I'll be assisting on the 17th.  I want to be a fast effective teacher, so that I can give attention to all of the Scratchers who need help.  I'll be unable to modify my style of instruction to these new kids.  I don't think that I will be as effective as I am in class.
I hope I'm wrong, but I'll have to figure out how to be effective with only the power of remote video and chat.

Python:
First, the criticism I've heard runs along the lines of: it isn't used as much as C or Java or some of the other languages which are 'more useful'.  I still think that it is a great first language.  Javascript made perfect sense after learning some of Python as was Google Scripting (pre-add ons, I haven't scripted anything since the change but I assume that the language is the same).  Python was also a logical extension of Scratch too.
My next school teaches AP Computer Science with Java.  so I started to learn Java last week through The Hard Way guide.  Different, yes, of course.  Easier, I don't think so.  It would not be my first choice or a good one to start with.  There are a lot of new concepts when first learning programming (and more that I haven't even thought or read about yet).  Python was easy so I could focus on the concepts that are common across all languages.  I'll keep pushing through on Java though.
Immediate application was also part of the fun of Python.  Minecraft on the Raspberry Pi is set up with an API and library that you can use to write little programs, in Python, that run within Minecraft.  Seeing this output was fun and rewarding for me.  I'm not a gamer but I am starting to love Minecraft.  How much more excited to keep pursuing programming will a student be when they can see their favorite game manipulated rather than just more: println("this is a typing assignment");

The Pi Camera attachment was delivered by my mom last week.  Writing scripts for that will be in Python as well.  More fun places to use programming in a real way for my own amusement and to teach with.  I'll blog once I get the camera set-up.  It is still in the box it came in, if that isn't a sign of how busy I am.  I'll usually stay up all night with my new toys.

Minecraft for Pi
Minecraft Edu
The Hard Way

Tuesday, July 30, 2013

Raspberry Pi

    So if you follow me on twitter, @jeffreywrensen or are friends with me on facebook, you've seen some pictures of a pile of computer parts and a comment with a few !!! at the end.  Those are my new Raspberry Pi computers, and this is a post of why I felt the need to add 2 more computers to a household that is currently at a 5:2 ratio of computers to people.  Actually, this is more of a guide of what I did.  Why did I need more computers?  I want to do my best to stay up with Tech especially when it is aimed at education.  I won't be teaching Scratch with a Pi, we'll still be using laptops, but the Pi's purpose is to teach programming in low-income areas.

    I got into Linux with the help of @urkomasse at the VinTech conference in January.  He also runs a great blog here.  You can set up a Pi using Windows, and there are many good guides, and many confusing ones.  I felt more comfortable setting things up since I had experience with Linux and using the Terminal (generally the same Bash commands as Mac).

   I found out about the Raspberry Pi shortly after, probably through twitter and decided that I wanted to play with them.  Last week I ordered two along with (I am linking everything to Amazon.com since it took me a while to decide what to buy and if it would work well) a DLink USB port, two mini wireless 
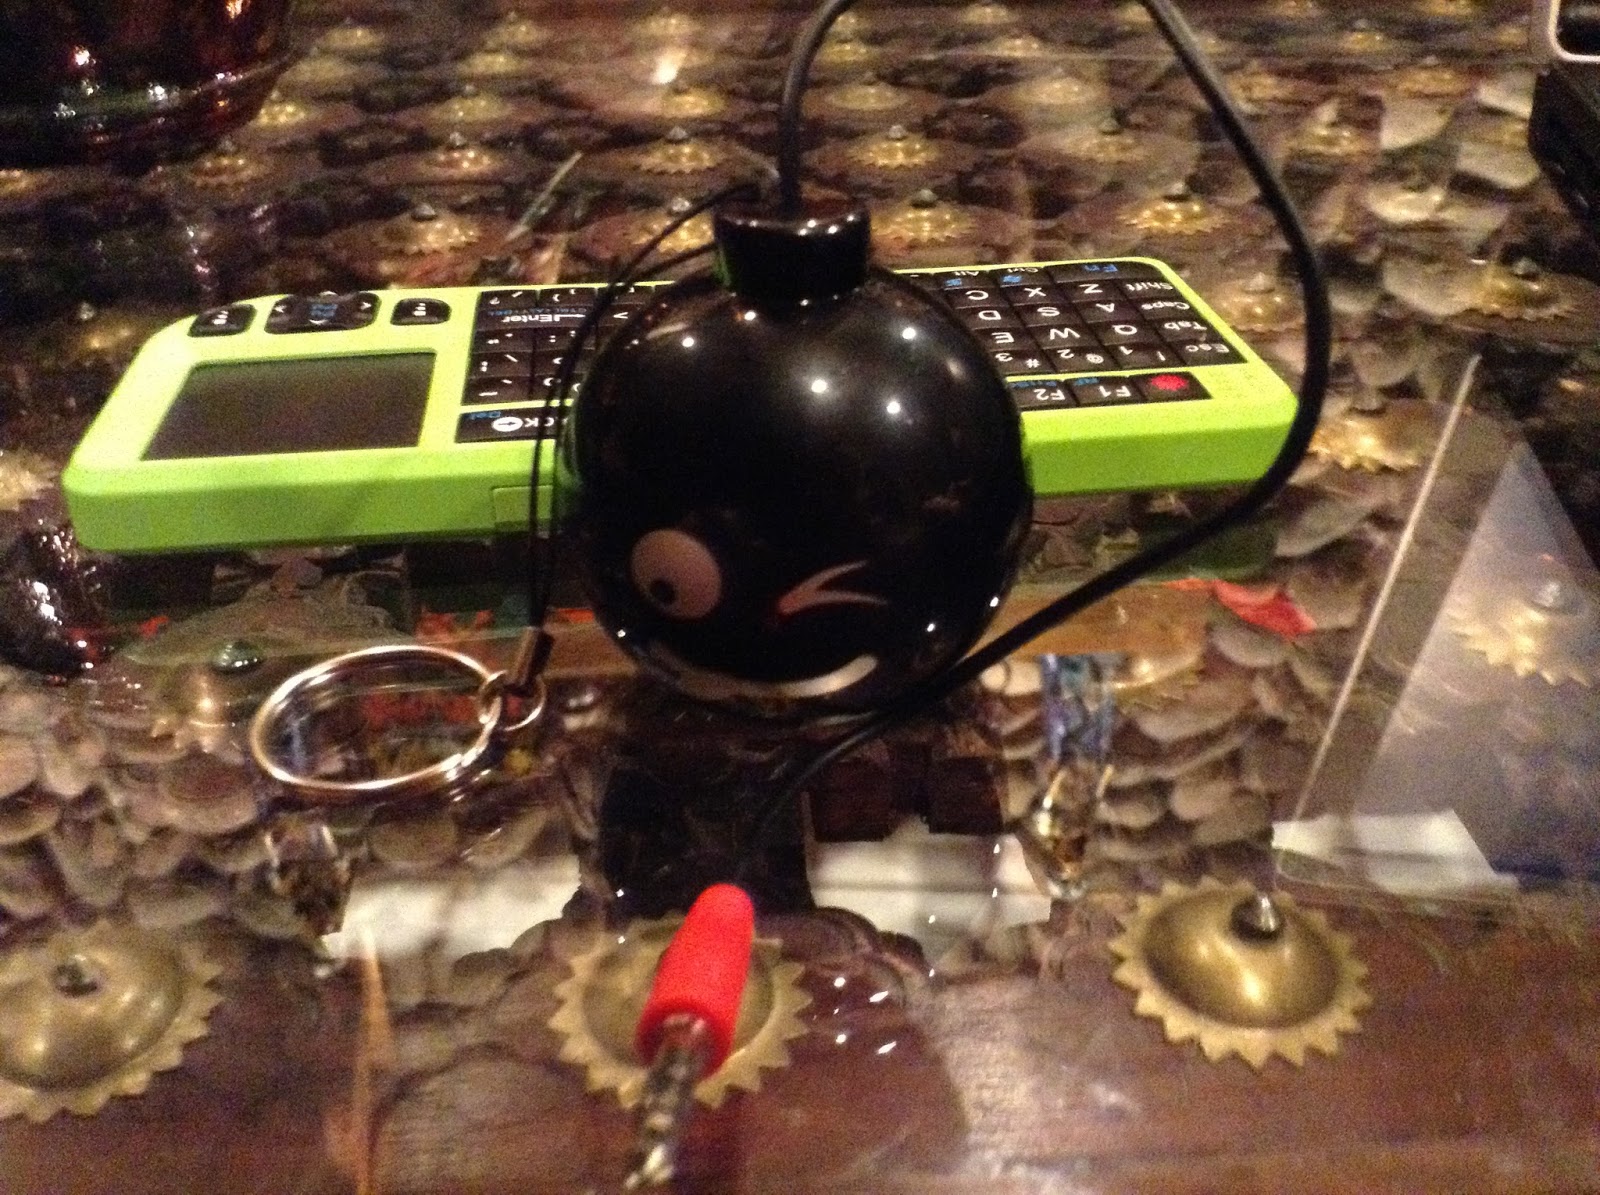
keyboard-mouse remotes, a 1.5 TB External HDD, a mini wifi adapter, 2 8GB SD cards and a few extra thumb drives.


    The bomb speaker and the keyboards both charge through USB so there are no batteries involved.  Is the sound wonderful?  Nope, but it is small and easy and unless I'm watching a Pink Floyd concert, it is an adequate speaker.


  The DLink was the hardest thing to verify before I bought it.  The reason I chose it was that it plugs into the wall and provides plenty of power through all of it's ports.  It powers the Pi and could power the external HDD.  Stupidly I got an HDD that also needs to be plugged into the wall.  There are a lot of USB 3.0 drives out there, but the Pi needs 2.0, and I also wanted more than a terabyte but I didn't want to spend too much.

   The mini keyboards feel a bit cheap, and it feels like I'm texting, but they have worked beautifully.  The only issue I've run into is the mini wifi adapter.  I've followed a guide that involves rewriting a .conf file to have it interact with the wifi.  It didn't work.  I haven't done a lot of trouble shooting with it though as I've had my fill of computer trouble shooting for this week.  I've simply used the Ethernet (cat5) cable plugged directly into the Pi for web access.

  So two Pies.  One I've set up as a media center, and the other is to play with and practice programming.  Setting up the SD cards (where all the information to run the OS is) was a bit confusing at first.  There are a lot of options, and the one I chose was called, appropriately: Noob.  Using the 'Start-up disk creator' I was able to make the SD card a start-up disk and install the .img from the unzipped folder on the disk.  This was all done in Ubuntu.  There are guides to set these up using Windows or Mac, but you would need to download a start-up disk creator program.  In Ubuntu it was quite easy.  I slid the SD card in, had the keyboard's usb receiver in and my RCA cable running from the Pi to an old CRT TV.  I took the micro (not mini) USB cable from my Verizon phone and plugged the USB A end into the Dlink and....

   Nothing.
I assumed it was the SD card, so I re-formatted it and tried again.

   Nothing.
I took off the RCA cable and tried running it through the HDMI cable into my mom's new TV. (I'll update about that at the end of this post).

   It worked!
   In Raspbian, the default video out is over the HDMI.  The instructions are to hit 1 or 2 or 3 or 4 to switch the output so that you can use the RCA cable.
Be sure to have the Ethernet cable plugged in, Raspbian (the OS) will want to run some updates.  A few minutes later I had Midori (the web browser) running perfectly.  I then shutdown the computer - using the terminal and had to quickly unplug it as well.  You are supposed to just unplug the Pi, but I still like to run the shutdown command.  The Pi will restart without the -r command since it is supposed to be turned on and off by being plugged in or unplugged.  I had done my reading and found that "diskutil list" didn't work on my laptop, and was ready to use hd, and start mounting the drive from the command line.  Instead, when Raspbian started up, the external drive was accessible through the GUI!  Watching videos however, was not going to happen.


 I tested this with the External HDD, but will leave a USB stick in it to save any work.


   Here are some shots of the screen while it is updating and fully installing Raspbian.


  In the command line you can run omxplayer (file name) after using cd to get into the folder that contains the video file.  This didn't work, and I think that I was typing in the file names wrong, it was 2:30 AM and I wasn't about to keep trying.  I also didn't want to bother doing this to watch videos.  VLC is my preferred player, but the Pi is not strong enough to run VLC.  This wasn't the purpose of this Pi anyways.
    With Raspbian installed, Scratch and a program to teach Python are on the desktop.  I'm half way through Learn Python The Hard Way  and will be playing with the Raspian program in the future.  So at this point I had one Pi running without wifi, but everything else was easier than expected.


   Putting together a media center was my next project.  I found that XBMC was the most popular one, but I was hesitant.  I wasn't interested in any of the software that gets live TV or displaying any metadata of the movies or TV shows that I was watching.  I just wanted to watch the videos that were on my external HDD.  I started at this page and tried to install Xbian as I liked the information that I read about it.  I downloaded the .7zip file, extracted the .img and ran Ubuntu's Start-up disk creator... and it failed, so I tried the .gz - instant failure as well.

   At this point I decided to try Raspbmc.  Downloaded the .7zip, got the .imp and wrote it to the SD card, perfect!  I would recommend the Raspbmc flavor of XBMC.  First though, make sure your Pi is plugged into your modem/router I was a few seconds late on this and the start-up dialogue tipped me off to my error as it repeatedly tried to find an internet connection.  As soon as I plugged it in, it started to install and update and do everything else it needed to automatically.  15 minutes later I was looking at a cool grey and red screen with a list of options - video, music and so on across the middle of the screen.  What i did not want to do was mount the hard drive and be stuck organizing my folders and re-naming files for XBMC to read them and download metadata and blah blah blah.  I clicked on the Video tab and had access to every folder and file on the HDD in a very nice GUI.  I simply clicked on the video file that I wanted to play - and it played!  Raspbmc also had easy to access settings menus to choose which video/audio output you wanted and had a few things that could be adjusted.

   I had no sound, and found that the default was HDMI sound rather than the 3.5mm jack (head phone or 1/8 inch jack)  I had this running into the audio RCAs in the back of the TV.  No audio could be heard.  I remembered my previous headache with the HDMI vs RCA of the first Pi and figured that it was probably the TV and not the Pi.  I plugged in my tiny bomb speaker and got great audio so I was right to blame the TV which is going to be recycled in a day or two anyways. So I'm finished!

   I will pursue wifi on the 1st Pi that is just for programming and fun.  For the media center one, I will use my laptop to manage torrents (I'm not a criminal mastermind, I'm mostly downloading shows that air for free in the US, but don't air in Hanoi like Modern Family and The Daily Show - which streams for free, but is really slow in Hanoi).  I'll just have to transfer these to the external HDD before I watch them using Raspbmc.  Is this the fastest way?  No, but I don't want to install a torrent client on the Pi or use the other programs that can run with Raspbmc like putty or the other software that is used to procure new video.  It runs quickly, is easy to navigate my HDD without: "XBMC will scan all of your media and create a personalized library complete with boxcovers, descriptions, and fanart. There are playlist and slideshow functions, a weather forecast feature and many audio visualizations. Once installed, your computer will become a fully functional multimedia jukebox." So I'm a happy camper.  Unlike Raspbian, XBMC requires that you shut down from within the GUI.  This is to keep all of the libraries in order.  I've not set these up, but I still use the shutdown button and pull the power cord as soon as the screen goes black.  Otherwise it reboots immediately.


   Here is a short video of Raspbmc starting up and playing Citizen Kane.  Two things that I learned that I cannot do while recording with a mini iPad; plug in a microUSB cable properly and remember to turn the keyboard on.  Either way, the video shows how fast it starts up and that you need not set up anything within XBMC, it is just a solid way to watch videos.


     I was interested in building an owncloud server, but didn't want to buy a third Pi and another HDD right now.  I'm also very happy with Dropbox.  I'm sure I'll find a project for the 1st Pi aside from web browsing, Scratch and Python.


    I also helped my mom chose an HDTV - they have wifi on all of them now, but I'm not interested in the junk that streams.  They also do not have VGA inputs anymore - at least not on the models I looked at.  So with a DVI-HDMI converter, I connected my old Dell that I used for video editing to the TV.  The computer is still quite speedy and has plenty of storage space.  It was however set to Raid0.  Installing Lubuntu, Xubuntu and Kubuntu failed.  I finally went back to good 'ol Ubuntu 12.04... and the grub would not install.  After a few tries, I used the start up ctrl-i interface to set both of the hard drives so no longer be Raid drives.  15 minutes later Ubuntu was running and the wifi was letting us stream Hulu.  I did run into an audio issue which was purely stupid.  I played with the system settings trying to get audio over the HDMI before I realized that the computer doesn't actually have HDMI and the DVI output wasn't pushing sound.  A nice little set of speakers later and it was perfect and everything was set up in ktorrent to be easy for my mom and she learned how to torrent.
    I also set up her old virus ridden XP computer in Ubuntu which she will use for streaming shows as well.  I love that Ubuntu can take an old, slow computer that is headed to the trash and revive it into a video center!

Here is Janet running everything from a wireless keyboard and watching Beauty and the Geek.


--Jeff